Showing posts with label Recipes-Bread. Show all posts

Thursday, July 9, 2009

Whole Wheat Pizza Dough

So, we have talked about Whole Wheat Bread and Cinnamon Rolls. Why not add another to the mix...Whole Wheat Pizza Dough! The best thing about this dough is it is just 1/6 of the Foolproof Bread Dough. So in one fell swoop you can whip out 2 loaves of bread, 1 batch of cinnamon rolls and a pizza! I did this last night and it was great! I had the main dish and dessert whipped out, just added a salad and Voila! I full and healthy meal with minimal effort.
To get the bread recipe, click HERE.

To make...
  • Prepare your dough according to the bread recipe
  • Roll out to desired shape
  • Cover with toppings
  • Bake in a 475 degree oven for 10 minutes or until crust is golden brown.


The other great thing about making your own pizza is that it is easy to store all ingredients. The crust has food storage written all over it, as does commercially bottled pizza sauce (although I am sure you could make your own and can it), cheese, meat, and veggies such as peppers and onions can easily be frozen, and you can store and use canned mushrooms and olives. The possiblities are endless. Who knew eating food storage could be so tasty!

Thursday, July 2, 2009

Whole Wheat Cinnamon Rolls

These cinnamon rolls are to die for...seriously...OK, they may not be worth death, but they are seriously good, seriously addicting, you should seriously make them!

Start by making the Foolproof Bread Recipe. If you would like the step by step instructions, click HERE.


Once your dough is made, divide it into three equal parts.


Then, roll out the dough into a nice, even rectangle.


It doesn't have to be perfect, as you can see, you just want your large "roll" to be as even as possible.


Then sprinkle with your toppings. I use cinnamon and brown sugar. The great thing about these cinnamon rolls is you don't need to lather the dough with butter. Nice and healthy...well, mostly. I actually like to make my own brown sugar, it is AWESOME!! If you would like the recipe...
Brown Sugar
1 Cup sugar
1-4 Tablespoons molasses (depending on desired flavor.) I use 2
Stir together with a wire whisk.


Top generously.


Then roll it up, nice and even.


Now it is time to slice it up. I have a sharp knife I use, but you can also use yarn, string or even dental floss (unflavored).


Lay them out on a jelly roll pan...if you have parchment paper, use it! It makes prep and clean-up SO easy. Then let them raise on your counter until they are double in size.


When they come out of the oven they should be nicely golden brown in color.


I like to frost them right when they get out of the oven, that way the icing just melts all over the rolls...I am telling you, crazy delicious!


At the end you get this. Whoa!


Make some today...you will be glad you did!!
Cinnamon Rolls (makes 1 dozen)
1/3 FOOLPROOF BREAD RECIPE (I usually make two/three loaves of bread and one pan cinnamon rolls.)
Roll into rectangle 3/4 inch thick. Sprinkle brown sugar, cinnamon, and any other topping you would like (I just do brown sugar and a generous sprinkling of cinnamon). Roll as a jelly roll. Cut 3/4 thick. Place in 1/2 size bun pan covered in parchment paper (I use a jelly roll pan). Let rise until almost double in bulk. When raised bake in 375 degree oven for 15 minutes. Ice and remove from pan while still warm.
FROSTING:
2 C powdered sugar
1/4 C soft butter
2 TB water
1tsp vanilla

Homemade Whole Wheat Bread...Step by Step

Oh goodness...it has taken far too long to get this post finished! I did spend a little time away on a small family vaca in the mountains...in a tent trailer...without even an outhouse! AAGGHH! But that is a story for another day, so for now, let's talk about whole wheat bread making...step by step!
This recipe is the one I use, I have posted about it before, so it is probably not new, but I thought it might be helpful to do a step by step tutorial for anyone who has tried to make it and it didn't work out, or just hasn't made it in awhile. Now, if you have a KitchenAid and don't think your machine can handle such a big recipe, give it another try by cutting the recipe in half. I have had others try this and have success.
Here we go...
Combine your warm water and a few cups of freshly ground whole wheat flour.


Does your machine have a "jog" switch? If so, use it a few times to just incorporate the water and flour a bit. If it doesn't, just turn your mixer on for 10 seconds or so, the two ingredients don't have be well mixed.


Now start to add the rest of your ingredients...oil, honey (do it in this order and your honey will just slide out of the measuring cup), salt, vital wheat gluten, dough enhancer, and SAF instant yeast.


What is Vital wheat gluten and Dough enhancer you might ask? Vital wheat gluten improves the elasticity in your bread while Dough enhancer makes it softer and improves the shelf life. Do you HAVE to use these things? No, but they will improve your final product over the long term.


OK, now turn your mixer to the lowest setting and start adding the remainder of your flour.


I usually add about a cup at a time for a few cups, then I add 1/2 cup at a time.


Keep adding...


Notice how my dough is sticking to the side of my bowl? I slowly add flour until the sides of the bowl start to become clean. If you are using a KitchenAid and you don't see this happening, just stop your mixer now and then to check the texture of the dough...you want it to be tacky, but not sticky, you need to be able to work with it. But as a general rule, it is better to add TOO LITTLE flour that TOO MUCH, so if you dough is a bit sticky...don't worry, you will still have great bread.


Just let the dough knead in the mixer for about 10 minutes.


By this time, you can see that the sides of my mixing bowl are completely clean. That is what you want.


You want a nice glob of dough...is that an appetizing word, glob? Sorry.


Next, move your dough to an oil sprayed surface (like PAM) not a floured one. At this point you have achieved your desired dough consistency, you don't want to be adding more flour.


Divide the dough into three equal parts (the recipe below says it makes 4 loaves, I make 3 because I use 4x10 bread pans). I rarely accomplish this on the first try, I am usually weighing the dough in my hands, cutting off a piece from one and adding it to another until I get fairly equal loaves.


Then either roll or flatten with your hand each dough segment (one at a time of course). This helps work out any air bubbles in your dough.


Next, roll the dough into a nicely shaped loaf. Sorry about the gimpy hand picture...I was trying to do two things at once...apparently not very well!


Your loaf should look something like this.


Now, put it into a greased loaf pan.


Then it is time to rise. You can do this two ways. #1...on your counter. #2...in a slightly warm oven. You can decide what works for you. The oven method is very fast, but my oven is acting weird, so I raise mine on my counter. Which ever way you choose, just wait to bake until your loaves are double in size.


Here are my loaves...ready to go in the oven.
If you choose to raise your loaves on the counter and you let them get as big as mine, you will want to preheat your oven and stick the loaves in when the oven is about 200-250 degrees (oven thermometer necessary) and cook for about 25-27 minutes (depending on your oven), but if you don't raise them as much, put them in a cold oven and bake for 30 min. at 350 degrees.


And after 25-30 minutes this is what you get...warm and tasty whole wheat bread! Nothing better!
To test your bread for doneness, tap the top and bottom of the loaf and listen for a "hollow" sound. If you hear that, you are good to go. If not, stick the loaves back in for 3-5 minutes.


FOOLPROOF BREAD
(Bosch Kitchen Recipes)
Small Batch (4 loaves in 4x8 pans)
4 C warm water
1 TB Salt
1/3 C Oil
1/3 C Honey
1 1/2 TB Dough Enhancer
1-2 T Vital Wheat Gluten
2 TB SAF Yeast
7 C Wheat Kernels

Freshly grind wheat into flour (medium setting). Add water and several cups of freshly ground whole wheat flour to mixing bowl with dough hook in place. Mix using a few short bursts of the jogging switch. Add the salt, oil, honey, dough enhancer, vital wheat gluten and instant yeast and jog briefly. While the mixer is kneading at speed one, slowly add whole wheat flour until dough pulls away from the side of the mixing bowl. This normally will take most of the whole wheat flour you have ground. It is better to add too little flour than too much flour. Allow the mixer to knead the dough until the gluten in the whole wheat flour is properly developed. This takes about 10-12 minutes. Your dough should have a slightly tacky texture. Turn oven on to preheat to 150 degrees. Shape into loaves and place in pans (previously well greased). Turn oven off. Put loaves in warm oven to rise until double in size. This will take approx. 25 minutes, but watch your loaves so you don't raise them for too long. When loaves are double in size, set oven to 350 degrees an turn it on (leave loaves in the oven). Bake for 30-35 minutes. When loaves are done, immediately remove from pans and let cool on wire rack. (Hint: so pans won't stick, wipe out while hot and don't wash them.)
Tomorrow I will be showing you how to use this same dough to make cinnamon rolls! I am telling you...you will be hooked!

Wednesday, June 24, 2009

Top of the Mornin'

Wheat generally gets a bad rap. For many, wheat represents "too healthy", "too heavy", "not tasty". I get these kind of comments when I try to serve whole wheat pasta, whole wheat tortillas, etc. There are few times I never get comments though...whole wheat bread, whole wheat cinnamon rolls and whole wheat pancakes. My husband thinks these WW pancakes are far tastier than their white counterpart. That is his opinion, judge for yourself.
Whole Wheat Pancakes
This recipe is great because you make a big batch of mix, then just stick it in your freezer and use as needed.

You start by combining WW flour, sugar, powdered milk, salt and baking powder.


Mix them all together until all ingredients are well incorporated. This is your base mixture. Use what you need, then store the rest in the freezer or refrigerator.


In a separate bowl, add an egg, water and oil.


Whip it up until it is nice and frothy. By doing this, you add lightness to your pancakes...tricky isn't it :)!


Now mix a portion of your dry ingredients with your wet ingredients.


Blend until just mixed.


Throw them on the griddle and wait for the magic!


Watch for the bubbles to appear...then flip!


Nice golden color...you are wanting to take a bite right now aren't you!


AAhh, the finished product. So tasty, so good for you, so easy! Whip some up this week!
Whole Wheat Pancake Mix
8 cups whole wheat flour
2 1/2 cups powdered milk
1/2 cup sugar
4 teaspoons salt
5 tablespoons baking powder
Mix all dry ingredients. Store in refrigerator or freezer.
To use mix:
1 1/2 cup mix
1 egg
2 tablespoons oil
3/4 cup water
Beat egg, water and oil, then add mix.
Makes approx. 8 medium sized pancakes


Monday, June 22, 2009

Wheat Week

I love using freshly ground wheat flour. I started using it slowly, mostly just in bread making, but over the last few years I have started to use it in almost everything...almost :). This week I thought I would post a few of my favorite recipes using whole wheat flour.
30-Day Bran Muffins
This is a favorite year round. You mix up the batter of these tasty muffins and let it sit in your fridge for up to 30 days. So when I want a muffin or two, or twelve, I just pull out the bowl, fill up a few muffins tins and 20 minutes later...viola! Wonderfully, healthy bran muffins!
Here is a little play by play.

Here is the muffin batter...I would have taken pictures of each step of preparation, but you would have gotten a little bored...it is SO easy!
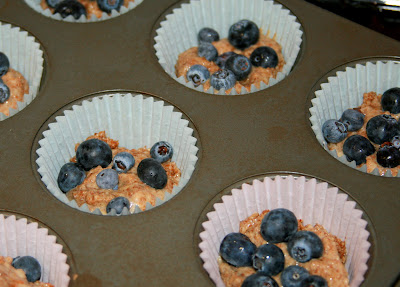

I scoop a bit of batter into each baking cup and then fill them up with blueberries (you don't have to but in berries if you just want a nice, plain muffin). Summer is high season for berries, so watch for them to go on sale at the grocery store, unless of course you grow your own. This batch of blueberries only cost me 99 cents for 6 oz. (if you are worried about stocking up because you can't eat them fast enough, just stick them in the freezer...they will stay good for months, at least for use in baking!)


Look at those berries...Beautiful!!


I scoop a little more batter on top so the berries are nice and nestled.


Then smooth it out on top and stick it in the oven.


At the end of it all, I am rewarded with this! Look at how those blueberries exploded! Aagghh...I can't wait to have a bite! Make some today...you will be glad you did!!

30-Day Bran Muffins (Favorites Cookbook)

4 cups All-Bran cereal

2 cups boiling water

1 cup butter

2 1/2 cups sugar

4 eggs

1 quart buttermilk

5 teaspoons baking soda

1 teaspoon salt

5 cups whole wheat flour

2 cups Bran Flakes cereal

Pour boiling water over All-Bran cereal and let sit. Cream butter and sugar; add eggs then dry ingredients alternating with buttermilk. Mix in All-Bran and water mixture. Last of all, stir in Bran Flakes. This batter stores in the fridge for 30 days and makes dozens of muffins! Bake at 400 degrees for 20 minutes in greased or paper-lined muffin tins.