Wednesday, September 23, 2009

A Low Calorie Option

I was watching the Biggest Loser last night and there was a segment with celebrity chef, Curtis Stone, where he was teaching the contestants tips for eating healthy. One tip he gave was to increase the volume of pasta dishes by making half of the "noodles" zucchini. Isn't that brilliant! You make the dish the same way, you are just adding more veggies and decreasing the starchy, higher calorie pasta.

And the best part...another way to use Zucchini!! The possibilities are endless!

The following are tips from Slashfood.com on making Zucchini Spaghetti, by Marisa McClellan...


"A while back, I hit upon a way of mimicking spaghetti noodles with zucchini that has become one of my favorite ways to prepare it. I use the fine matchstick blade on my mandoline (Amazon has some for under $10 that would do the job nicely) and slice the zuke lengthwise, so that I come away with long strings of squash that look like squared off spaghetti (don't use the inner seeded area, as it just shreds).

I heat a little olive oil in a nonstick pan, mince a couple of cloves of garlic and toss it all together over medium heat until the zucchini softens but isn't mushy. I like to eat it just like that, a sort of "pasta" alio olio that's a bit healthier than the traditional one due to the use of veg instead of starch. You could also top it with pasta sauce or toss other veggies in for a primavera. Play around, anything goes as long at it tastes good."

How about...

Zucchini, Potato and Scallion Pancakes?

Molten Chocolate Cake with Zucchini?

Zucchini and Corn Quesadillas?

Whole Wheat Zucchini Walnut Muffins?

Kitchen Sink Minestrone?

Click on the above links for great recipes!

Create away!

Monday, September 21, 2009

A little more Zucchini Talk

I am feeling the need to talk about zucchini for two reasons…First, because I thought my zucchini plant was done producing and I was sad about it but luckily it started up again and now I am happy.  Secondly, because we hosted a neighborhood breakfast in our backyard over the weekend and while talking “gardening” with some neighbors, realized that not all people are enjoying zucchini at their finest.  So, for those who may be interested I thought we could talk…optimal zucchini size.  Intriguing isn’t it?!

When one thinks of zucchini it is easy to envision the 2 foot long 1 foot wide monster that well…looks like this.  I have been privy to a few of these each year and while you can find ways to use them, they are not ideal. 


picture via oztion.com.au

So what is ideal you might ask?…


IMG_3349 

Something more like this.  About 1/2 –1 foot long and about 3-4 inches in diameter. 


IMG_3352

You can even go a little smaller if you want Italian Squash…which by the way they use ALL of the time in their cooking…even in eggs, excuse me, in frittatas.  Delish!


IMG_3351

So even though there is a temptation to let these little things grow nice and big…resist!  Pick them small and enjoy them in a variety of dishes.  Or if you are like me, just roast them up.

  • Slice it
  • Put it in a pan
  • Drizzle with Olive Oil
  • Sprinkle with Salt
  • Mix it all up
  • Bake at 350 degrees for 20 minutes (or until soft)

Enjoy!!

Monday, September 14, 2009

Another Idea...Frozen Peach Cocktail

Let me just start off by saying that I love peaches, not just a little bit, a lot. I eat two or three everyday. So, if there is anyway I can preserve them and enjoy them during the months my trees lie dormant, I jump on it.

One challenge with peaches is they don't stay good forever. If left in a warm place (somewhere other than the refrigerator), peaches will continue to ripen and can become too soft and even moldy if left for too long. I found myself in this predicament last week and needed a quick and delicious way to preserve my peaches. Luckily my Mom told me about a Frozen Peach Cocktail she was making and after hearing the ingredient list...I ran straight to the store to make my own!


Frozen Peach Cocktail


First peel and cube your peaches.


Then, put in 1 cup of sugar to every 3 lbs. of peaches.


Mix 'er all up.


After letting it sit for a little while, add 1 can of crushed pineapple (per 3 lbs. of peaches), undrained.


Now here come the tasty part. Add 3 cups orange juice (not from concentrate). It sounds good already, doesn't it! (I am making a double batch).


Then go about juicing your lemons. I am sure you don't HAVE to have fresh lemon juice...I just thought it sounded good.


Squeeze, squeeze, squeeze...


Until you have 1 cup (that is for a double batch).


Put the juices into your peach/pineapple mixture.


Then just bag it up and put it in the freezer until you need it.


Very easy and Very tasty!


Frozen Peach Cocktail

3 lbs. (12 medium) fresh peaches
2 cups sugar
1 can (15-1/4 oz) crushed pineapple, undrained
1/2 cup lemon juice (2 lemons)
1 1/2 orange juice (3 oranges)
Peel peaches; cute into bite sized pieces to make 6 cups. Sprinkle with sugar; set aside. After a few minutes stir in pineapple, orange juice and lemon juice. Spoon into plastic freezer containers; freeze. To serve while still frosty (which is when it is best), allow to stand at room temperature about 3 hours. Bananas may be added at serving time.
Makes 6 pints

Thursday, September 10, 2009

What I Learned From My Garden...Part 3

I had two goals this summer in regards to my garden. Container gardening and vertical gardening. We already know how my container gardening went...so here are the results of my vertical garden...


  1. Sugar Snap Peas- Success

  2. Cucumbers- Success

  3. Zucchini- Whoa...wait until you see the pictures!


This is my Zucchini Plant. It is enormous. See that thing in the middle?


That would be a "burning bush" that we planted last spring. It is completely engulfed by the Zucchini plant. The one that is NOT growing vertically.


Hence the trellis that is propped up behind the plant...for decoration.

Lesson #3
Be vigilant if you plant a "BUSH" variety when you are wanting to grow vertically. And if possible, find a "viney" option.

Apparently I didn't pay much attention to the package of seeds I purchased, just chose one that looked good in the picture and buried it in the ground. It grew wonderfully and has produced many lovely Zucchinis, but just not vertically...Bummer.

I am not giving up, I will try again next year. But this is what I will do different...
  • "Install your string support or stake immediately next to the seed you have just planted. You will want the support as near to the plant as possible, so as to minimize unnecessary bending of the plant. Also, putting the support in now will help you avoid disturbing the root system by installing it later.

  • Tie the resulting zucchini sprouts up to the stake every few days as it grows. It will grow flat and back down to the ground, so you must tie it up every three days or so. Simply lift it gently into position and attach to the support. Continue this process until your squash is ready to eat."

If you are interested in trying your hand at growing squash vertically, click HERE to get more detailed info.


Wednesday, September 9, 2009

What I Learned From My Garden...Part 2

One of my goals this year was to try my hand at container gardening.


I did a little research, chose some of my favorite herbs, and sat back to watch my plants flourish.


Unfortunately this is what happened...at least to my Basil anyway. Oh, so sad! No matter what I did, this poor little plant never seemed to have a chance. I fertilized and watered, but it just never seemed to be enough.


Lesson #2:

Be very mindful of growing space when planting in a container.


Containers can be deceiving. Mine seemed enormous and there seemed to be a lot of space in between my plants...but those little plants wanted to become big plants and there just wasn't enough room. If you are considering container gardening, here are a few helpful links.

As for me...next year I will only be planting three herbs in my pot and will be planting my Basil and Parsley in the garden so they can grow to their hearts content.

Tuesday, September 8, 2009

What I Learned From My Garden...Part 1

My whole purpose for gardening each year is not just for the produce, but more importantly for the knowledge I gain. Some of it I gain from my successes, but more often than not I learn from my failures. So, this week I thought I tell you what I learned from my gardening failures...the good, the bad, and the ugly.
Lesson #1:
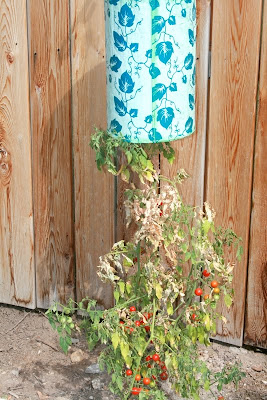
Do not plant anything in a Topsy Turvy.
This is what has become of my cherry tomato plant that I planted in a Topsy Turvy. I have a good handful of ripe tomatoes...but do you notice the large brown section in the middle. Yeah, that's where it is dieing...slowly.

Here is a closer shot, just so I know you believe me.

Now, I am not dissing the Topsy Turvy. I am sure there are many people who have had a successful run with one of these things, I am just not one of them. My problem is that I got tired of watering it everyday...day in and day out. I would forget and you CAN'T forget...it gets brown and dies if you forget. Not good.

So, first of all, I must apologize to my neighbor Danielle, who stood on a chair in her yard and hung over our shared fence to water this thing the whole time I was in Lake Powell. I tried to take care of it Danielle, I really did, it is just so high maintenance!

Second of all, I am going to promise Danielle that I will never again grow any produce in a hanging basket. They dry out too fast and therefore are too much work for me...or for my neighbors.

If you have had a different experience please let me know...otherwise, I am giving this growing method a thumbs down...with a cherry tomato on top.

Thursday, September 3, 2009

Advice to Parents on H1N1

If you have turned on your TV at all in the last few weeks, you have probably noticed an increase in reports on the H1N1 virus. Many of these reports have been alarming to say the least and can make anyone watching feel a sense of panic. Being aware and using the information to guide us in being prepared, is good. But feeling panicked never brings about desired results, so when I read the following article, I thought it was worth passing along.

The following are excerpts from an article written by Dr. Sanjay Gupta for cnn.com.

"Over this past week, I had some interesting conversations with colleagues who are also health care professionals. These conversations usually start with, "You know what I hate about the media ... ?"

People were scared, more than I had seen in a long time. And, health care professionals were blaming the media -- accusing them of being alarmist.


So, I decided to get away from the studio, away from the talking heads discussing mortality rates, and away from the hypothetical discussions about what might or might not happen. I wanted to see for myself what was happening in emergency rooms right now.

I wanted to create a parents' guide to dealing with the swine flu that is based on the best science and my interviews with experts all over the country.

First off, there is no question that pediatric emergency rooms are much busier than this time last year -- about two to three times busier at the ER I visited.


Many of the patients sitting in the waiting room were there with flu-like symptoms, worried about H1N1.

The doctor who met me started by saying he was giving the media a C+ in its overall coverage of H1N1, and blamed his busy ER, in part, on the media for stoking fears.


"Fair enough," I answered back, "but, how do I get to an A?" In order to get there, I wanted to report clear, concise answers about what a parent should do with a sick child. So, here we go.

Point 1. As things stand now, the vast majority of children who develop flu-like symptoms this fall will have a few miserable days, and nothing more. And those days are best spent at home -- not in the ER or a doctor's office.
Point 2. If you are worried, you should call your pediatrician's office first. Don't take your child in without calling. Two reasons: Your child may not have H1N1, but could become exposed by being around sick children. And, after several hours of waiting, you are still likely to be told the basics -- plenty of fluids, rest and dose-appropriate acetaminophen for a fever. After all, it is still the flu we are talking about.
Point 3. One doctor told me a way to think about things that was helpful. He said "remove the term H1N1 from the equation." If your child had regular flu, would you take him to the hospital? If the answer is no, then don't take him/her to the hospital now.
Point 4. Yes, hearing between 30,000 and 90,000 could die from H1N1 is scary, but keep in mind -- around 40,000 people die from the regular or seasonal flu every year. The numbers may not be that much different, yet there is not panic about the regular flu. As things look now, H1N1 is causing only mild to moderate illness, not the widespread deaths people are worried about.
Point 5. There are some children who should be seen by their doctor.
Call your doctor if:
• A baby younger than 12 weeks has a fever greater than 100.4 degrees Fahrenheit
• A child, older than 12 weeks has a fever for three days
• A child's fever returns after a 12-24 hour time period
• A child is not passing urine or making tears for more than six hours
• A child does not smile or show interest in playing for several hours
Dial 911 if:
• A child cannot speak while trying to breathe
• Has a blue or dark purple color to the nail beds, lips or gums
• Is not responding to you because he is too tired or weak

One point that was reinforced to me over and over again by the pediatricians is the best place for a sick child is at home. And, with regard to school -- after 24 fever-free hours without the aid of medications, he or she can go back."

I hope this information is helpful, if you would like to read the article in its entirety, click HERE.

Wednesday, September 2, 2009

The Mystery Veggie

Drum roll please...
the name of our mystery vegetable is...
A Lemon Cucumber!!
Crazy looking little things, but absolutely the BEST cucumbers in the world! Give them a try next year...you will never be the same.


Bravo to those who answered correctly...and to those who answered creatively!
Our winners are...
  • Jordyn Perkins
  • Danielle
  • Suzanne (because I loved your answer and I too LOVE lemon cucumbers...they are the staple of all summer produce.)

So, if you answered correctly, please email me at safelygathered@gmail.com with your mailing address and I will send these little seeds on their way.

Tuesday, September 1, 2009

It's Quiz Time

With all of our talk of gardens and gardening, I thought it appropriate to have ourselves a little quiz. So here it is...
What is the name of this scrumptious vegetable?
(here is a hint: they are kind of small, about 5 inches in diameter, and grow on a vine)
As a reward for your intelligence, the first two people to correctly identify this veggie will receive in the mail a lovely package of seeds so that they too can grow some of these next year. They will change your life. Trust me.
P.S.- if we share the same bloodline (that means you sisters) there will be no entering for you...that would be cheating...unless of course no one else enters, then you can. Love ya!

Monday, August 31, 2009

And The Result Is...Success!

Saturday has come and gone and the desired task has been completed! We bottled peaches! I was crazy uptight about it...but you know what, it was actually very easy. If I can do it...anyone can do it!! Seriously.
For anyone else who would like to try their hand at canning some peaches this summer, here is what we did.
We first washed all of our peaches...our "purchased" peaches mind you. Our two trees are just babies and our entire harvest was about 15 peaches...better luck next year!


After we had given them a nice bath in some nice cool water...

We threw them into this boiling hot inferno to loosen their skins. Brutal but necessary.
Don't worry though, after about 60 seconds they were soon cooling off in this ice cold bath. You don't want them to cook.

In the meantime, I am making a simple syrup. I chose to do a medium syrup as that seems to be the syrup of choice for many canners. The recipe is 3 1/4 cups sugar to every 5 cups of water. I did a double batch. Cook this over medium-high heat until all of the sugar is dissolved. Once dissolved, turn your stove down to low so the syrup stays nice and warm. Make sure to not let any evaporation occur (I did this by just putting a lid on the pot).


Then it was peeling time. This would probably be what took the longest. So, just put on some good tunes and peel away.


Once all of your peaches are nice and slimy...


You can put them in your jars. Make sure and put them "pit" side down and layer them. Fill your jar to almost the first rim.


When you are done, your jars will look a little something like this.


Now it is time to pour in the simple syrup you made previously. You are supposed to fill your jars up to a "generous" 1/2 inch from the top of the jar. Also, try and get rid of any air bubbles that might have formed by either sliding a non-metallic utensil down around the fruit or just do what I did...just lightly shake the bottle around.


Once you have done that, it is time to put your hot lids on. To get your lids to the correct temperature, put them into a saucepan of water. Heat the water to a simmer (do not boil) then turn the temperature down. Leave the lids in the water until you are ready to use them. Make sure and only heat the lids, not the bands, you will want the bands nice and cool so you can twist them on. And you don't need to tighten them too tight...just until "resistance is met, then increase to finger-tip tight" Ball Home Preserving.


Now it is time to stick them in the pot and fill `er up. If you are incredibly strong, you can fill up the pot then move it. But if I were doing it alone, I would probably put the pot on the burner...then fill it with water. Make sure when filling your pot that your water level is at least one inch above the top of the bottles.


Then, crank up the heat. If you have a gas stove top or an electric coil type stove top you are good to go. If you have a ceramic top stove, you will probably need to look for another heating option as the water needs to boil CONTINUOUSLY for 30 minutes (with quart jars) and ceramic stove tops tend to have heat plates that cycle on and off. I have that problem, so we just pulled out the ole Camp Chef and that did the trick. And I didn't have to heat up my kitchen to boot. Yahoo!


Just checking for that "heavy rolling" boil so we can start the timer. Once it started, we timed it for 30 minutes, then turned off the heat...took the lid off...and let the jars sit for 5 minutes.


After that, we stacked them up on a towel, in a non-drafty spot, and waited to hear the "plink" of a nicely sealed jar.


And lucky for us they all sealed. We didn't do that many peaches...about 20 lbs. or so, but that was a good start. We learned a new skill and now I can't wait to tackle something else...next time...jalapeno pepper jelly! I am swimming in those things!!

Friday, August 28, 2009

My Next Great Adventure


Growing up, we always had a garden. It was one grown out of need rather than want, but it was a great blessing for my family. My Mom became a Master Gardener as well as a Master Preserver (is "preserver" a word?). Our garden produced far more than we could eat, so my Mom found ways to preserve it for use throughout the year.

One staple was bottled fruit and veggies. Too be honest, I don't remember eating them much, but our storage room was lined with bottled peaches, pears, tomatoes, etc. Stored food was a critical element to our family making ends meet. Canning was an valuable skill.

Because of this I decided to embark on a new adventure. One that would require a list of important items. So, I went out and got...

One of these.


This black beauty.

One red funnel.


A jar lifter.


A couple cases of these.


And a 20 lb. box of these.

Tomorrow is the day. The day I will tackle my goal for the summer of 2009...
bottling peaches...
without my mother.

I will let you know how it goes.

Monday, August 24, 2009

Wheat Grinder


I have talked about this grinder before, the VitalMill, it is a great one if your main focus is to grind wheat or other grains for bread. The cheapest I have ever seen it is around $140 (unless of course you buy it in bulk, then I have seen it for $119.00). Anyhoo, Emergency Essentials has this beauty on sale for $129, which is a sweet deal if you are in the market for a wheat grinder.
So if you or anyone you know wants a wheat grinder...head down to Emergency Essentials and take a look!

Friday, August 21, 2009

Food Storage Shelf Life

I recieved an email this morning from Emergency Essentials that I thought had some good information to pass along.

Food Storage Shelf Life
"The question is regularly asked, “What is the shelf life of my food storage?”
It is important to first identify what is meant by “food storage” and “shelf life.”
“Food storage” that is intended to be held long-term is generally considered to be low moisture food packed in either #10 cans or in metalized bags placed within large buckets. (A note from me...I do not think it is necessary to use a metalized bag in your large buckets as I don't think you can do it yourself and therefore have to pay commercial prices for your pre-packed food storage...that can be really expensive. And with most foods, unless you were planning on NEVER rotating them, can store nice and long without them.)

“Shelf life” can be defined in the following two ways: “Best if used by” shelf life - Length of time food retains most of its original taste and nutrition.“Life sustaining” shelf life - Length of time food preserves life, without becoming inedible.

There can be a wide time gap between these two definitions. For example, most foods available in the grocery store that are dated have a “Best if used by” date that ranges from a few weeks to a few years. On the other hand, scientific studies have determined that when properly stored, powdered milk has a “Life sustaining” shelf life of 20 years. That is, the stored powdered milk may not taste as good as fresh powdered milk, but it is still edible.

2. Understand food constituents. Food is composed of the following:
Calories:
A unit of measurement of energy derived from fats, carbohydrates and protein.
Fats: A wide group of compounds that are generally soluble in organic solvents and largely insoluble in water.
Carbohydrates: Simple sugars as well as larger molecules including starch and dietary fiber. Proteins: Large organic compounds that are essential to living organisms.
Vitamins: A nutrient required for essential metabolic reactions in a living organism.
Minerals: The chemical elements required by living organisms, other than carbon, hydrogen, nitrogen, and oxygen.
*Stored in Ideal Conditions

Minerals and carbohydrates do not change much during storage. But proteins can denature and deteriorate in quality. Fats can acquire off odors and off flavors known as rancidity. Vitamins are susceptible to destruction by heat, light, and oxidation. Importantly, even if some components deteriorate, the fat, carbohydrates and proteins still contribute calories. To prevent starvation, the most important component is calories.

Examples of Dehydrated Food Shelf Life
Recent scientific studies on dehydrated food have shown that food stored properly can last for a much longer period of time than previously thought. This research determined the “life sustaining” shelf life to be the following:
Wheat, White Rice, and Corn 30 years or more*
Pinto Beans, Apple Slices, and Macaroni 30 years*
Rolled Oats, and Potato Flakes 30 years*
Powdered Milk 20 years*
*Stored in Ideal Conditions

Examples of Freeze-Dried Food Shelf Life
Freeze-dried food is excellent for long-term food storage. Mountain House® has tested some of their freeze-dried foods and the results were excellent! Because of this research, they have a “best if used by” shelf life of 25 years. As an added benefit, freeze-drying fruits, vegetables and meats help maintain the foods original shape, color and taste.
Freeze Dried Blueberries, Strawberries, and Apples 25 years*
Freeze Dried Broccoli, Green Peppers, and Potatoes 25 years*
Mountain House Freeze Dried Chicken Stew, Vegetable Stew with Beef,and Chili Macaroni 25 years*
*Stored in Ideal Conditions

3. Recognize that the shelf life is extremely dependent on the following storage conditions:
Temperature:
Excessive temperature is damaging to food storage. With increased temperature, proteins breakdown and some vitamins will be destroyed. The color, flavor and odor of some products may also be affected. To enhance shelf life, store food at room temperature or below; never store food in an attic or garage.
Moisture: Excessive moisture can result in product deterioration and spoilage by creating an environment in which microorganisms may grow and chemical reactions can take place.
Oxygen: The oxygen in air can have deteriorative effects on fats, food colors, vitamins, flavors, and other food constituents. It can cause conditions that will enhance the growth of microorganisms.
Light: The exposure of foods to light can result in the deterioration of specific food constituents, such as fats, proteins, and vitamins, resulting in discoloration, off-flavors, and vitamin loss. "

Tuesday, August 18, 2009

Mobile Washer

I went to Emergency Essentials today to pick up an item I thought was worth discussing.

It is called the Breathing Mobile Washer and it is non-electric option to washing your clothes. It looks a lot like a plunger and can easily disassemble for easy storage.


" This washer uses a technique of pushing and pulling the water through the clothes. This reduces much of the wear that would come from the friction method (using a washboard). Due to the agitation motion, much like a mechanical washing machine, less soap is required to do an effective cleaning job.
Minimal water is required to have this washer work effectively. In fact four inches in a five-gallon bucket in ample water (one and a half gallons). Several garments could be washed in this water, depending on the amount of dirt. The rinsing could be used by the same amount of fresh water."

Until August 25th, this washer is on sale at Emergency Essentials for $10.99, down from their previous sale price of $17.95. I think the MSRP is $19.99.

The next time I have to wash something by hand, I am going to try this little puppy. I will let you know how it goes.

If you want more information of this product...click HERE

(Disclaimer: I am in no way affiliated with this company, or with any company...other than the company I keep here at home :). So my reviews of things are unbiased and meant only to provide info. I will now go about my work! And sorry this paragraph is so big...I cannot get the font to shrink!)

Thursday, August 13, 2009

Chocolate Zucchini Cake

In an effort to use up the zucchini I grated the other day, I decided to make another "zuke" recipe...this time a sweet one!
Chocolate Zucchini Cake!
I started by creaming together the white and brown sugar, butter and oil.

I then started to add the rest of my wet ingredients and realized that it called for buttermilk...which I didn't have...so I just made some :)!


1/2 cup milk to 1 1/2 teaspoons lemon (or vinegar). Let it sit for 5 minutes. There you have it...
Homemade Buttermilk!


After mixing all of my wet ingredients up, I started to combine my dry ingredients...flour, cinnamon, salt, baking soda,unsweetened cocoa powder and allspice...aagghh, allspice! What is that! I don't have any allspice! So, once again, I just made my own :)! Love Google!


Homemade Allspice- equal parts cinnamon, nutmeg, ground clover and black pepper. I used 1 teaspoon of each.


Mix all of your dry ingredients together and slowly add to your wet ingredients.


Already looking good isn't it!


Once it is nice and combined and has a neat looking swirl like this one...


Add your grated zucchini.


And mix it up smooth.


Put it in a 9x13 inch pan and sprinkle it with 1 cup chocolate chips...mine are looking a little old, but they melted up nicely...luckily! Then, put it in a 325 degree oven for 45 minutes.


When its done, you get something that looks like this. I am telling you, those chocolate chips are a wonderful addition to this cake! After it has cooled, frost with your favorite frosting. Mine is chocolate...plain and simple.


And for all of your hard work, you get this. I am telling you, this is one tasty, tasty cake. It is beyond just your average chocolate cake. Wonderfully rich, wonderfully moist, wonderfully tasty. Pair it up with a little ice cream and you won't even know what hit you. Make some today, you will be glad you did!
Mom's Chocolate Zucchini Cake
by tessabella76
1 cup Brown Sugar, firmly packed
1/2 cup Granulated White Sugar
1/2 cup Butter
1/2 cup Vegetable Oil
3 whole Eggs
1 teaspoon Vanilla
1/2 cup Buttermilk
2 1/2 cups All-Purpose Flour
1/2 teaspoon Allspice
1/2 teaspoon Cinnamon
1/2 teaspoon Salt
2 teaspoon Baking Soda
4 Tablespoons Cocoa
2 cups Grated Zucchini
1 cup Chocolate Chips
Preheat oven to 325 degrees. In a large bowl, cream the sugars, butter, and oil. Add eggs, vanilla, and buttermilk. Mix well. Mix dry ingredients and add to wet ingredients. Stir in zucchini. Pour into greased 9x13 pan. Sprinkle top with chocolate chips. Bake for 45 minutes or until knife or toothpick comes out clean. Let cool, then frost with your favorite frosting.
Chocolate Frosting
6 Tablespoons Butter
2 2/3 Cup Powdered Sugar
1/2 Cup Unsweetened Baking Cocoa
1/3 Cup Milk
1 teaspoon Vanilla
Cream butter. Add powdered sugar and cocoa and slowly mix together while adding the milk. Finish off with the vanilla. Easy, Peasy.