Thursday, July 2, 2009

Whole Wheat Cinnamon Rolls

These cinnamon rolls are to die for...seriously...OK, they may not be worth death, but they are seriously good, seriously addicting, you should seriously make them!

Start by making the Foolproof Bread Recipe. If you would like the step by step instructions, click HERE.


Once your dough is made, divide it into three equal parts.


Then, roll out the dough into a nice, even rectangle.


It doesn't have to be perfect, as you can see, you just want your large "roll" to be as even as possible.


Then sprinkle with your toppings. I use cinnamon and brown sugar. The great thing about these cinnamon rolls is you don't need to lather the dough with butter. Nice and healthy...well, mostly. I actually like to make my own brown sugar, it is AWESOME!! If you would like the recipe...
Brown Sugar
1 Cup sugar
1-4 Tablespoons molasses (depending on desired flavor.) I use 2
Stir together with a wire whisk.


Top generously.


Then roll it up, nice and even.


Now it is time to slice it up. I have a sharp knife I use, but you can also use yarn, string or even dental floss (unflavored).


Lay them out on a jelly roll pan...if you have parchment paper, use it! It makes prep and clean-up SO easy. Then let them raise on your counter until they are double in size.


When they come out of the oven they should be nicely golden brown in color.


I like to frost them right when they get out of the oven, that way the icing just melts all over the rolls...I am telling you, crazy delicious!


At the end you get this. Whoa!


Make some today...you will be glad you did!!
Cinnamon Rolls (makes 1 dozen)
1/3 FOOLPROOF BREAD RECIPE (I usually make two/three loaves of bread and one pan cinnamon rolls.)
Roll into rectangle 3/4 inch thick. Sprinkle brown sugar, cinnamon, and any other topping you would like (I just do brown sugar and a generous sprinkling of cinnamon). Roll as a jelly roll. Cut 3/4 thick. Place in 1/2 size bun pan covered in parchment paper (I use a jelly roll pan). Let rise until almost double in bulk. When raised bake in 375 degree oven for 15 minutes. Ice and remove from pan while still warm.
FROSTING:
2 C powdered sugar
1/4 C soft butter
2 TB water
1tsp vanilla

Homemade Whole Wheat Bread...Step by Step

Oh goodness...it has taken far too long to get this post finished! I did spend a little time away on a small family vaca in the mountains...in a tent trailer...without even an outhouse! AAGGHH! But that is a story for another day, so for now, let's talk about whole wheat bread making...step by step!
This recipe is the one I use, I have posted about it before, so it is probably not new, but I thought it might be helpful to do a step by step tutorial for anyone who has tried to make it and it didn't work out, or just hasn't made it in awhile. Now, if you have a KitchenAid and don't think your machine can handle such a big recipe, give it another try by cutting the recipe in half. I have had others try this and have success.
Here we go...
Combine your warm water and a few cups of freshly ground whole wheat flour.


Does your machine have a "jog" switch? If so, use it a few times to just incorporate the water and flour a bit. If it doesn't, just turn your mixer on for 10 seconds or so, the two ingredients don't have be well mixed.


Now start to add the rest of your ingredients...oil, honey (do it in this order and your honey will just slide out of the measuring cup), salt, vital wheat gluten, dough enhancer, and SAF instant yeast.


What is Vital wheat gluten and Dough enhancer you might ask? Vital wheat gluten improves the elasticity in your bread while Dough enhancer makes it softer and improves the shelf life. Do you HAVE to use these things? No, but they will improve your final product over the long term.


OK, now turn your mixer to the lowest setting and start adding the remainder of your flour.


I usually add about a cup at a time for a few cups, then I add 1/2 cup at a time.


Keep adding...


Notice how my dough is sticking to the side of my bowl? I slowly add flour until the sides of the bowl start to become clean. If you are using a KitchenAid and you don't see this happening, just stop your mixer now and then to check the texture of the dough...you want it to be tacky, but not sticky, you need to be able to work with it. But as a general rule, it is better to add TOO LITTLE flour that TOO MUCH, so if you dough is a bit sticky...don't worry, you will still have great bread.


Just let the dough knead in the mixer for about 10 minutes.


By this time, you can see that the sides of my mixing bowl are completely clean. That is what you want.


You want a nice glob of dough...is that an appetizing word, glob? Sorry.


Next, move your dough to an oil sprayed surface (like PAM) not a floured one. At this point you have achieved your desired dough consistency, you don't want to be adding more flour.


Divide the dough into three equal parts (the recipe below says it makes 4 loaves, I make 3 because I use 4x10 bread pans). I rarely accomplish this on the first try, I am usually weighing the dough in my hands, cutting off a piece from one and adding it to another until I get fairly equal loaves.


Then either roll or flatten with your hand each dough segment (one at a time of course). This helps work out any air bubbles in your dough.


Next, roll the dough into a nicely shaped loaf. Sorry about the gimpy hand picture...I was trying to do two things at once...apparently not very well!


Your loaf should look something like this.


Now, put it into a greased loaf pan.


Then it is time to rise. You can do this two ways. #1...on your counter. #2...in a slightly warm oven. You can decide what works for you. The oven method is very fast, but my oven is acting weird, so I raise mine on my counter. Which ever way you choose, just wait to bake until your loaves are double in size.


Here are my loaves...ready to go in the oven.
If you choose to raise your loaves on the counter and you let them get as big as mine, you will want to preheat your oven and stick the loaves in when the oven is about 200-250 degrees (oven thermometer necessary) and cook for about 25-27 minutes (depending on your oven), but if you don't raise them as much, put them in a cold oven and bake for 30 min. at 350 degrees.


And after 25-30 minutes this is what you get...warm and tasty whole wheat bread! Nothing better!
To test your bread for doneness, tap the top and bottom of the loaf and listen for a "hollow" sound. If you hear that, you are good to go. If not, stick the loaves back in for 3-5 minutes.


FOOLPROOF BREAD
(Bosch Kitchen Recipes)
Small Batch (4 loaves in 4x8 pans)
4 C warm water
1 TB Salt
1/3 C Oil
1/3 C Honey
1 1/2 TB Dough Enhancer
1-2 T Vital Wheat Gluten
2 TB SAF Yeast
7 C Wheat Kernels

Freshly grind wheat into flour (medium setting). Add water and several cups of freshly ground whole wheat flour to mixing bowl with dough hook in place. Mix using a few short bursts of the jogging switch. Add the salt, oil, honey, dough enhancer, vital wheat gluten and instant yeast and jog briefly. While the mixer is kneading at speed one, slowly add whole wheat flour until dough pulls away from the side of the mixing bowl. This normally will take most of the whole wheat flour you have ground. It is better to add too little flour than too much flour. Allow the mixer to knead the dough until the gluten in the whole wheat flour is properly developed. This takes about 10-12 minutes. Your dough should have a slightly tacky texture. Turn oven on to preheat to 150 degrees. Shape into loaves and place in pans (previously well greased). Turn oven off. Put loaves in warm oven to rise until double in size. This will take approx. 25 minutes, but watch your loaves so you don't raise them for too long. When loaves are double in size, set oven to 350 degrees an turn it on (leave loaves in the oven). Bake for 30-35 minutes. When loaves are done, immediately remove from pans and let cool on wire rack. (Hint: so pans won't stick, wipe out while hot and don't wash them.)
Tomorrow I will be showing you how to use this same dough to make cinnamon rolls! I am telling you...you will be hooked!

Wednesday, June 24, 2009

Top of the Mornin'

Wheat generally gets a bad rap. For many, wheat represents "too healthy", "too heavy", "not tasty". I get these kind of comments when I try to serve whole wheat pasta, whole wheat tortillas, etc. There are few times I never get comments though...whole wheat bread, whole wheat cinnamon rolls and whole wheat pancakes. My husband thinks these WW pancakes are far tastier than their white counterpart. That is his opinion, judge for yourself.
Whole Wheat Pancakes
This recipe is great because you make a big batch of mix, then just stick it in your freezer and use as needed.

You start by combining WW flour, sugar, powdered milk, salt and baking powder.


Mix them all together until all ingredients are well incorporated. This is your base mixture. Use what you need, then store the rest in the freezer or refrigerator.


In a separate bowl, add an egg, water and oil.


Whip it up until it is nice and frothy. By doing this, you add lightness to your pancakes...tricky isn't it :)!


Now mix a portion of your dry ingredients with your wet ingredients.


Blend until just mixed.


Throw them on the griddle and wait for the magic!


Watch for the bubbles to appear...then flip!


Nice golden color...you are wanting to take a bite right now aren't you!


AAhh, the finished product. So tasty, so good for you, so easy! Whip some up this week!
Whole Wheat Pancake Mix
8 cups whole wheat flour
2 1/2 cups powdered milk
1/2 cup sugar
4 teaspoons salt
5 tablespoons baking powder
Mix all dry ingredients. Store in refrigerator or freezer.
To use mix:
1 1/2 cup mix
1 egg
2 tablespoons oil
3/4 cup water
Beat egg, water and oil, then add mix.
Makes approx. 8 medium sized pancakes


Tuesday, June 23, 2009

Martha Stewart Cookie Jar

I saw these cookies in the latest Martha Stewart Food Magazine and just had to make them. I mean, they had whole wheat flour in them! If you can't make it up the canyon but are craving some S'Mores...this is for you!!
S'MORES COOKIES
1/2 cup old-fashioned rolled oats
1 cup whole wheat flour (spooned and leveled)
1 cup all-purpose flour( spooned and leveled)
3/4 teaspoon ground cinnamon (a great addition to this cookie!)
1/2 teaspoon baking soda
1/2 teaspoon salt
1 cup (2 sticks) unsalted butter, room temperature
3/4 cup light-brown sugar
1 large egg
8 oz. bittersweet or semi-sweet chocolate, cut into 30 squares
15 large marshmallows, halved horizontally
Preheat oven to 350 degrees. In a food processor, pulse oats until finely ground. Add flours, cinnamon, baking soda, and salt; pulse to combine. In a large bowl, using an electric mixer, beat butter and sugar until light and fluffy. Beat in egg, scraping down side of bowl. With mixer on low, beat in flour mixture just until combined.
Drop dough by tablespoons, 1 inch apart, onto two baking sheets. Top each with a chocolate square. Bake until just lightly golden, 11 to 13 minutes, rotating sheets halfway through. Remove sheets from oven ; heat broiler. Top each cookie with a marshmallow. One sheet at a time, broil until marshmallows are lightly browned, 1 to 1 1/2 minutes. Transfer cookies to wire racks to cool.
Makes 30
My cookies were a bit too big...the cookie should only end being a little bigger than the marshmallow, but they still tasted good and it was fun for my kids to "roast" marshmallows in the oven! When forming your dough balls, keep in mind that these are "bite sized" cookies.

Enjoy!!

Monday, June 22, 2009

Wheat Week

I love using freshly ground wheat flour. I started using it slowly, mostly just in bread making, but over the last few years I have started to use it in almost everything...almost :). This week I thought I would post a few of my favorite recipes using whole wheat flour.
30-Day Bran Muffins
This is a favorite year round. You mix up the batter of these tasty muffins and let it sit in your fridge for up to 30 days. So when I want a muffin or two, or twelve, I just pull out the bowl, fill up a few muffins tins and 20 minutes later...viola! Wonderfully, healthy bran muffins!
Here is a little play by play.

Here is the muffin batter...I would have taken pictures of each step of preparation, but you would have gotten a little bored...it is SO easy!


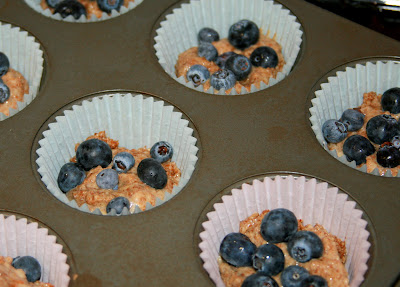
I scoop a bit of batter into each baking cup and then fill them up with blueberries (you don't have to but in berries if you just want a nice, plain muffin). Summer is high season for berries, so watch for them to go on sale at the grocery store, unless of course you grow your own. This batch of blueberries only cost me 99 cents for 6 oz. (if you are worried about stocking up because you can't eat them fast enough, just stick them in the freezer...they will stay good for months, at least for use in baking!)


Look at those berries...Beautiful!!


I scoop a little more batter on top so the berries are nice and nestled.


Then smooth it out on top and stick it in the oven.


At the end of it all, I am rewarded with this! Look at how those blueberries exploded! Aagghh...I can't wait to have a bite! Make some today...you will be glad you did!!

30-Day Bran Muffins (Favorites Cookbook)

4 cups All-Bran cereal

2 cups boiling water

1 cup butter

2 1/2 cups sugar

4 eggs

1 quart buttermilk

5 teaspoons baking soda

1 teaspoon salt

5 cups whole wheat flour

2 cups Bran Flakes cereal

Pour boiling water over All-Bran cereal and let sit. Cream butter and sugar; add eggs then dry ingredients alternating with buttermilk. Mix in All-Bran and water mixture. Last of all, stir in Bran Flakes. This batter stores in the fridge for 30 days and makes dozens of muffins! Bake at 400 degrees for 20 minutes in greased or paper-lined muffin tins.

Wednesday, June 17, 2009

A Few Deals

  • I am not lost...it is just summer and we are just going with the flow a bit. I am actually terrible at "going with the flow", so I am practicing! My posts may be a bit inconsistent during the summer months, but then again, I might get on a roll, who knows, but don't forget me...I am still here and will be continuing to post.

    I thought I would let you know about a few good deals going on this week...

    Smith's
  • 10lb. bag Russet Potatoes- $1.79 (quick and easy dinner!)
  • Fresh Wild Caught Alaskan Keta Salmon (whole or half)- $2.49 lb (great for now or freeze for later!!
  • Kroger Cottage Cheese 16 oz.- $1.00
  • Kroger Veggie Dips 16 oz.- $1.00
  • Dasani Water Bottles 24 pk. (limit 8)- $2.99
  • A&W or Sunkist- 4 for $5 and when you buy four you get a FREE 1.75 qt. of Private Selections Ice Cream when you use your FV card. (Have Rootbeers Floats this weekend, then reuse the bottles for water storage!)

Dan's

  • WF Medium Cheddar Cheese 2lb Loaf- $3.99 (can freeze for later use)
  • WF Sour Cream 24 oz.- $1.19
  • Saturday, June 20th Only...Marinated In-Store Petite Steaks-$1.99 lb.

Friday, June 12, 2009

Your 3-Month Supply


Like Organic foods? Click HERE to get coupons for Stoneyfield Farms Products.


Enjoy!!

Thursday, June 11, 2009

Tips From the Moon

I haven't had the chance to try out these recipes yet, but they are definitely on my to-do list! I'm not one to make a totally separate meal for my toddler, so I love the recipes that I can make for everyone. Here's a few that I thought sounded good! These recipes are all from
Annabel Karmel's The Fussy Eaters' Recipe Book.
Annabel's Secret Tomato Sauce
1 T. olive oil
1 small red onion, chopped
1/2 leek, carefully washed and finely chopped
1 garlic clove, crushed
1/4 red bell pepper, chopped
1/2 medium carrot, chopped
1/2 medium zucchini, chopped
one 14.5-ounce can diced tomatoes
2/3 cup vegetable broth
3 T. tomato paste
1 t. superfine sugar
1 T. torn fresh basil leaves (optional)
salt and freshly ground black pepper, to season

Heat the oil in a pan and saute the onion and leek for approximately 3 minutes, stirring occasionally. Add the garlic and saute for 1 minute. Add the bell pepper, carrot, and zucchini, and cook for another 3 minutes, stirring occasionally. Add the tomatoes, broth, tomato paste, and sugar, and stir for approximately 1 minute. Simmer uncovered for 25 to 30 minutes, stirring occasionally, until thickened. Stir in the basil leaves, if using. Transfer to a blender and blitz the sauce to a puree. Season to taste with salt and pepper.

Orzo Salad
1/3 cup orzo
2 T. peas, cooked from frozen
1/4 cup drained canned corn
1/2 cup cubed cooked chicken
Dressing
1 T. mayonnaise
1 T. sour cream or Greek-style yogurt
1 t. water
1/2 t. white wine vinegar
1 1/2 t. snipped fresh chives

Cook the orzo according to the package directions. Drain and mix with the peas, corn, and cooked chicken.
Whisk together all the ingredients for the dressing and toss with the salad.

Mummy's Ramen Noodles
2 1/2 ounces Chinese-style dried thin egg noodles (lo mein) or use bean thread (cellophane) noodles
1/2 cup chicken broth
1 1/2 t. soy sauce
1/3 cup frozen peas
1/2 cup drained canned corn or frozen corn
1/2 cup shredded cooked chicken
1/2 t. cornstarch
1 scallion, thinly sliced

Cook the noodles according to the package directions. Drain and set aside. Put the broth, soy sauce, peas, corn, and chicken in a pan over medium heat. Bring to a simmer and cook for 2 minutes.
In a small cup, mix the cornstarch with 1 teaspoon cold water and add to the contents of the pan, then cook, stirring, for another minute or until the liquid thickens slightly. Add the noodles and scallion and reheat briefly, stirring. Transfer to a bowl or small cup to serve.

Wednesday, June 10, 2009

A Few Tips and Recipes (age 6-9 Months)

Introducing your baby to solid food can be a frustrating experience. With each bite, more food seems to come out of their mouth than stays in it. One good thing about homemade baby food is the flavor, babies actually like to eat it, so eating time is a bit more enjoyable.

This introductory time, 6-9 months, is also a great time to introduce lots of new flavors as babies tend to be more open to change (everything for them is new). The more flavors they are introduced to, the better chance you have of them not being picky eaters in the future.

I started basic...First Purees

Carrots

Apples

Squash

Sweet potatoes

Peas


After a couple of weeks I introduced more fruits and vegetables...

Potatoes

Broccoli

Cauliflower

Berries

Bananas (not suitable for freezing)

Mango

Avocado (not suitable for freezing)


I steam all of the fruits and veggies that require cooking. Here is a general cooking guide.
Apples-8 min.
Pears- 3-4 min.
Carrots, Potatoes, Sweet Potatoes, Butternut Squash,
and Pumpkin- 15-20 min.
Tip: Add some leftover cooking water to the steamed fruits and veggies
to thin them out while blending.
Just add it slowly until you have reached your desired consistency.
And don't blend potatoes in a blender or food processor as the mixture will become
starchy, use a food mill instead.


I usually spend one morning, once a month making baby food. Once I start, it is easy to whip up a nice array of food. Even though my baby is now 9 months old, I still like to freeze simple, first purees and then mix them when I warm them up. Carrots are a great combo with Peas because the sweetness of the Carrots balances out the strong flavor of the Peas. Apples and Pears go great together as do Green Beans, Corn and Carrots, and Broccoli and Potatoes. When babies get older, you can also make up and freeze a great cheese sauce which goes GREAT with veggies!


Here are some of my baby's favorites...


Apple and Pear Puree


Ingredients

2 eating apples (I use Gala)

2 ripe pears

4 tbsp pure unsweetened apple juice or water

Generous pinch of ground cinnamon (optional)

Put the fruit into a saucepan together with apple juice or water and pinch of cinnamon (if using), cover and cook over a low heat until tender (about 6 to 8 minutes). Blend the fruit to a smooth puree.

Suitable for freezing


Vegetables and Lentils


Ingredients

2 T butter

1 1/2 cups leeks, finely sliced

1/4 cup celery, chopped

1/3 cup red lentils ( or any color you have)

1 medium carrot, peeled and chopped

2 cups sweet potato, peeled and chopped

1 bay leaf

2 cups vegetable stock or water

Melt the butter in a saucepan and saute the leeks for 2 to 3 minutes. Add the celery and carrot and saute for 5 minutes. Add the lentils, saute for one minute, then add the sweet potato and bay leaf and pour over the stock. Bring to the boil, then reduce the heat, cover and simmer for about 30 minutes, or until the vegetables and lentils are tender. Remove the bay leaf and blend to a puree.
Suitable for freezing
MAKES 6 PORTIONS


The BEST Oatmeal!!


Ingredients


1/2 cup milk


1/4 cup quick oats


6 ready to eat dried apricots, chopped


1 large ripe pear, peeled, cored and cut into pieces

Put the milk, quick oats and chopped apricots in a small saucepan, bring to the boil and then simmer, stirring occasionally for 3 minutes. Puree together with the chopped pear in a hand blender. (You can also add the pear to the oatmeal mixture during the last few minutes of cooking if you want a thinner texture).

Suitable for freezing

MAKES 4 PORTIONS


all pictures and recipes courtesy of annabelkarmel.com

Tuesday, June 9, 2009

Tips From the Moon

While we are waiting for "Tips from the Coop" to return...I thought perhaps we would like to hear a few "Tips from the Moon"...Moon being my sister Marianne...funny nickname, long story!

FUSSY EATERS

I have two fussy eaters...one is three years old, the other is eight months old. They are obviously fussy in different ways, but both often make eating time a bit difficult! I really tried to feed my three year-old a variety of things so she wouldn't be a fussy eater...either I didn't do a good enough job, or it just didn't work. She will not eat any fruit unless it's in the form of a fruit snack. She will eat some vegetables but is very picky. I continue to try to introduce/hide new foods to make her diet a bit more well-balanced, but it is not easy! My eight month-old has major texture aversion. I know that she is young and can grow out of it, but add to it that she has a very sensitive gag reflex, and I am dealing with a lot of throw up when I try to introduce chunkier foods. Hence, eating time is a bit difficult.

I just picked up a book from the library by Annabel Karmel called The Fussy Eaters' Recipe Book. I've only had it for a couple of days, but I like the information I've read thus far. Some of her tips that I think might work for me...

  • Make healthy junk food. I've got a hot dog, corn dog, chicken nugget lovin' kid. This book has some great recipes for homemade pizzas, chicken nuggets, and even ramen noodles.
  • "Disguise vegetables by blending them into a tomato sauce and serve with pasta. You can double-bluff by leaving a few chunky vegetables in the sauce for your child to pick out, then he'll never suspect that ther are still some in there." Brilliant!
  • She says that the key to getting your child to like eating salad is to have a good dressing. There are some great dressing recipes that even sound good to me!
  • "Children like eating with their fingers, so serve vegetables such as corn on the cob with melted butter, or baked potato wedges." That is so true about my child!
  • Tying right in with the "being prepared" theme of this blog, she also recommends getting your kids involved in growing a garden as they may be more interested in eating foods that they watched grow. I've seen first-hand how Jac's kids are interested in the food from their garden!

As for my baby, I did have a small success the other day. Thanks to Jac's inspiration, I also make my own baby food. The purees are always a hit, so I ground up some cooked chicken and mixed it in with carrots and sweet potatoes and she had no idea that it was even there! I may get her to chew food without gagging yet!!

P.S. Annabel Karmel has some great baby food recipe books too, and I just saw a recipe for pureed lentils and vegetables that actually looked good. Yahoo for food storage and homemade baby food! I've never felt so resourceful!

Monday, June 8, 2009

Homemade Baby Food

I know this post does not apply to everyone...but I just think it is a very "provident" thing to do, so if you have far surpassed needing baby food, pass the info onto a friend.

I personally started to make my own baby food this past year. My motivation was a financial one and I knew I would save TONS of money making my own rather than purchasing it....so I went to the library, checked out a few books on the topic and was well on my way.

I started simple, just copied the "Gerber 1st" Foods and the results were amazing. Not only did I save a lot of money, but my baby LOVED to eat it! This food actually had flavor! I have been just kicking myself that I didn't make my own baby food for my other children.

Here are the basics of what I do...

Steam the fruits and veggies until they are cooked through, puree them up in my blender, and fill up ice cube trays full of food to freeze until a later date.


Once frozen, I label and date a freezer bag and fill 'er up.

I then put my nicely labeled bag into a plastic container that is already full of other labeled bags and stick it back in my freezer.


When I am ready to serve it up, I take one serving (2 food cubes, this is potatoes and carrots) and warm it up in the microwave until it is nice and steamy. Then I just let it cool on the counter for awhile until it is just slightly warm. (Although this picture does not show them slightly warm...more like totally frozen, but you get the idea :)!)

Voila! Lickity split! Yummy, tasty baby food.
This week we will be talking tips, recipes, fussy eaters, etc. So come on back now ya hear!
P.S. Joey, if you are out there...we are missing Tips From The Coop! Come back soon!

Friday, June 5, 2009

A Little Freebie

So this may not be exactly everyone's idea of a 3-Month Supply item, but for my husband it is!


Every Friday through September, Mars is giving away coupons for free chocolate bars (I just had a couple delivered this week!). They offer 250,000 each Friday with a limit of 1 coupon per email address and 4 coupons per household. You must also be 13 years or older to enter.

Click HERE to get your coupon!!

Here's to filling up our food storage and our stomach with rich chocolate!!

Wednesday, June 3, 2009

What to write...

I am sitting here staring at the computer screen, wondering what to write about. My brain is somewhere else...I need to adjust my focus. In the meantime, when you have 9 minutes and 18 seconds, check out this YouTube video on Gathering your 3-Month Supply.

http://www.youtube.com/watch?v=pqUSUx_mZyA